Showing posts with label Cross Stitcher. Show all posts

Friday, 30 March 2018

AKA: the Christmas Pudding Chicken-Robin

I has a old magazine "freebie' stitch kit running around on the floor so I decided to do it to get it out of the way.

It's alway a bit hit and miss with these old kits if I still have the magazine they came with, and therefore have the pattern. I gave heaps to the second hand shop a while back.

In this case I didn't even look, just did a search and found the magazine on a Russian website. (CrossStitcher issue 298). The picture of the pattern was a bit blurry so it was really hard to follow the backstitching but I suppose that's my punishment for being too lazy to see if the magazine was still running around the house and visiting a website of questionable copyright legitimacy.

I asked my brother which one he thought I should stitch, he said 'the chicken'...
he's 30. sigh.

So I went with the robin (not a chicken). I tweaked it a bit just cos I could.
The body uses three strands of floss, 2 of DMC 436 and 1 of 818 DMC. I figured I had some extra colours might as well use them to add some character and three strands to make the body a bit bulkier / pronounced. This unfortunately resulted in the robin looking a little like a Christmas pudding. Hence the title it was honoured with once finished - "Christmas Pudding Chicken-Robin". Regardless I don't mind the effect.

I also made the eyes more defined and left off the odd white line. I was going to use a French knot if needed but the black eyes looked fine as is.

There are some people out thee who love backstitch, I am not one of them. It took me an extra day to bother finishing it for that reason.

I also didn't turn it into a brooch. The hoop is about 5cm in size and I thought it would look silly as a brooch. Instead I plaited up the leftover floss into a hoop to turn it into a tree ornament. Much better.


Finished:


Sunday, 19 April 2015

Woodland Christmas kit - owl

This little guy was made using the designs and items from the free kit that came with Cross Stitcher October issue number 284. There are 5 designs, a deer, hedgehog, owl, badger and fox. The original design was for some felt Christmas decorations but I didn't really see the point I making them as I never put up a Christmas tree. Seemed pretty redundant.  Instead I decided to wing it and make some sewing accompaniments.  First off the bat is the owl design - made into a scissor fob.

I did the owl on one side as per the pattern, two threads over two. Then on the other side I made a itty bitty owl using one strand over one. He was a bit fiddly and I'm unsure if all my crosses ended up fully correct but in the end looked incredibly cute. 

At the bottom before I sewed it all up I should have made sure it was a little more pushed out. As it is one side looks a little squished. And it did have a tassel but I didn't like it so snipped it off. I used some random ribbon to embellish the top and glue along my rough stitching on the left side.  And all done. Next up I think a pin keep. 

Saturday, 14 March 2015

Monogram Necklace

Just a quicky kit from the January 2015 Cross Stitcher magazine.  Pretty straight forward, you stitch your little letter then stick it in the plastic frame that came with the kit. 

It came with more than enough floss and the letter choice were fairly nice. I decided to put my design on a little bit of offcut from the foam board I used when framing my Hummingbird & Morning Glories design to raise the design up. Otherwise it would have sat quite deep in the frame. I like how that turned out. 

BUT I was lazy with the glue.  I couldn't be bothered finding my craft glue so just used some random super-glue that was in the kitchen...yeah not really the best idea I've had. Smelt bad, ended up going everywhere and dried too fast so I couldn't adjust the angle of the design.  I would have been much better off finding the right glue or even not using any glue at all. The board on the back would have held it into the frame fairly securely. Sigh. My own fault.

Finished product:

Saturday, 25 October 2014

Butterfly necklace

I picked up a copy of Cross Stitcher at the local newsagent the other day.  Almost entirely because it had a cat on the front and a wooden butterfly cross stitch frame. Actually not even 'almost' it WAS the entire reason.
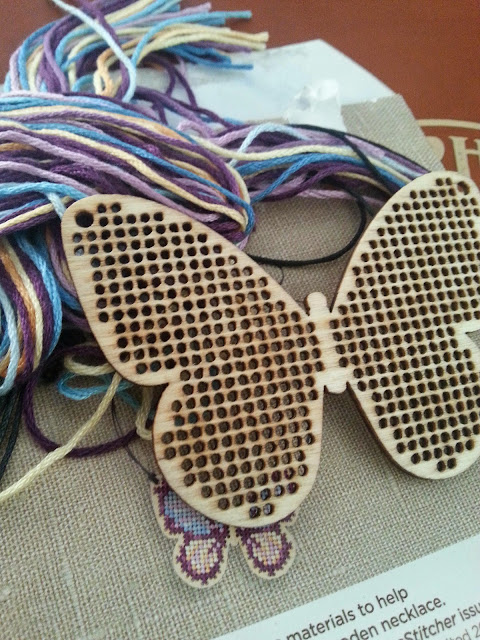
On opening the kit I discovered I had gotten two bundles of thread...This would seem to imply that someone out there did not get their thread. So if you brought the August 2014 copy of Cross Stitcher and your free gift was missing it's bundle of floss. Hey it's at my place, drop me a line if you still need it :p

Getting two lots of floss might have been useful IF I'd ever intended to use the colours and design provided with the magazine. But no I never did. If I'm going to make a butterfly necklace then it's going to look like a real butterfly as much as I'm able to make it. And the 'jewel-toned wooden necklace' design with the magazine..? Not so much like a real butterfly. The original design as seen in the picture of the kit was designed by Angela Poole. My final product designed by me. The design size is 5.5x8cm and contains about 4hours of stitching work.

To begin I gathered some random leftover floss I had running around, black,  white, Sullivans #45300 (similar to DMC 970), what I THINK is DMC 900 or something close and from the original magazine kit DMC 3854. Googled monarch butterfly images and started stitching.  I made up the design as I went along, this seems to work well for me. 

I managed to almost immediately loose the needle from the kit. I may need to be careful where I sit/walk for the next few weeks. Fortunately I had two spare needles stuck in the black floss (lost them too, all in one evening. But these two I at least found again so no harm done).

I used a full 6 floss strands on the cross stitches rather than the usual 2 just for coverage on the wood. I considered going crazy and using 8 strands which would have been really thick and potentially luxurious looking but I didn't have that much floss and 6 seems to work well enough for me. For the backstitching I used 2 strands, I tried 1 but it just didn't stand out enough on the wings to look like a real monarch. Two worked much better although did have an annoying tendency to separate, showing the two separate lines instead of just one darker/thicker thread, I probably should have deliberately twisted it before stitching. 

The black in the design is straight forward. The orange in the bottom wings is the Sullivan #45300, in the top wings it's 4 strands Sullivans and 2 strands DMC 900. In the top corner of each of the upper wing's there is one cross in white and two in DMC 3854. 

Despite a bit of trial and error the stitching was fairly straight forward except one stupid row on the upper right wing right at the top. I stitched my crosses backwards. The whole row needed to be frogged.  While I was cutting out the incorrect stitches I managed to gouge my frame as well. This can still be seen if you look closely as the new stitches dip where the frame is damaged. Though it is slightly hidden by the backstitching now.

Lastly I coated a piece of back felt with some craft glue and covered (most) of the back. This was to obscure the stitching on the back. The felt doesn't quite cover everything but it does the job well enough. It'll make it more comfortable to wear too I expect. 

I actually spent the entire stitching experience thinking I was going to break the frame. The little guy was fairly fragile feeling and I'm a rough stuff. Fortunately it made it mostly in-tacked and looking good.

On a final note, the one thing I would recommend when working with wooden frames is a pair of pliers. Threading the needed under to tie down an end can be quite hard as the frame is unforgiving and the stitching quite tight. The pliers make it just that much easier to yank the thread through.

Finished Product;


And here be some progress picks;

Monday, 30 September 2013

Owl freebie kit

Another little freebie kit from Cross Stitcher completed. Lots a little finishes seem to be what I need at the moment. 

This one, the good, the bad and the ugly.

The good;
Soluble canvas :-)
I started a free kit ages ago for the Queens Jubilee (also from Cross Stitcher) but never finished it. Lost interest then lost the kit. So this was my first completed use of soluble canvas and all I can say is that I'm already planning to use it again designs picked and everything. Good stuff and it looks funky while melting. An added plus.

The bad;
The instructions for the blanket stitch to finish the kit were sadly lacking. Basically just said squash the wings in and blanket stitch around the design. Let me ask you, how the hell do you blanket stitch without an edge?

And while I do know how to blanket stitch - the one stitch other than cross I do know, their instruction if you didn't know was a little lacking. At the very least for people who cross stitch only they could include a little step diagram.

Also not mentioned was how many strands to use for the blanket stitch. I decided on 2 for that extra bit of strength.

The ugly;
A carry on from the limited instruction regarding the blanket stitch when I reached the wings and ribbon I was '???' In the end to make sure they were secure I stitched them in place then blanket stitched the blue edge on either side of the wings. It looked rough and messy but at least I know the wings are not going anywhere. The ribbon I don't mind but where the wings meet the body...blah.

*

I also added some brown blanket stitch on the edge of both wings just to make the a little more interesting.

No idea what I'm going to do with it now since anything attached to my keys needs to be significantly more robust than this little owl. Maybe a gift for someone who's a little less brutal to their stuffs?

The light's not the greatest but if I don't post it now who knows when I'd get around to it.
Hehe, I'm melting! Melting!

Thursday, 5 September 2013

Floral Cards Kit from the July Cross Stitcher

I've had a nice box I picked up at my local craft shop sitting around for a while. I always intended to cross stitch some flowers to go in the top but hadn't yet got around to it. So when I saw the most recent copy of Cross Stitcher (to hit Australian shelves - July 2013) on the magazine rack at the start of the week with a free kit of three flowers I knew it was perfect.

I started stitching the same day I purchased the magazine. The flowers were quite quick to complete, easily manageable in a few evenings while watching a movie or 2. I didn't really like the idea of putting the finished designs on the provided cards. Dull, and I generally don't give cards so ultimately useless. So the box I fortunately had on hand was perfect.

The designs didn't quite fit the box vertically so I cut 2 strips from the cards provided with the kit and edged the design. A bit of tape and the designs trimmed down. All done.

Very happy with the end result though I may still stain the wood of the box with some colour.

Design by: Angela Poole
Design size: 4x6cm each

Sunday, 1 July 2012

Winter wonderland

Winter wonderland


I got this kit in a bulk lot I brought of ebay and promptly threw it on the pile and forgot about it. Fast forward a few months and I'm finally cleaning all my rubbish off the living room table and in the process unearthed this gem.

Only one problem... I had the free kit part that had originally come with a magazine but not the magazine containing the chart.

Here is where I am eternally grateful that we live in the time of the Internets as 30minites on Google revealed to me not only could I download the chart but it was FREE! So happy! Only downside (if you can call it that) the cleaning for that day completely ceased.

And to add to the feeling of fate a couple of days before I'd unearthed the kit I'd see the perfect frame in a local shop. A weekend or so of stitching, a walk down the street and there you have it. The cutest teddy ever sitting on my
book(dvd)shelf.


some work in progress shots;


Sunday, 23 October 2011

Just a Quicky

Quick-stitch soldier


The beginning of the end. I picked up this little guy with a magazine in 2011 as a free kit. And on completion the seed of a crazy stitcher was germinating.  

His hands are meant to be in grey and his beads are wonky in this shot but on a whole quite happy with him. He still graces my fridge as a magnet to this day (2013).